Wild Garlic Scones

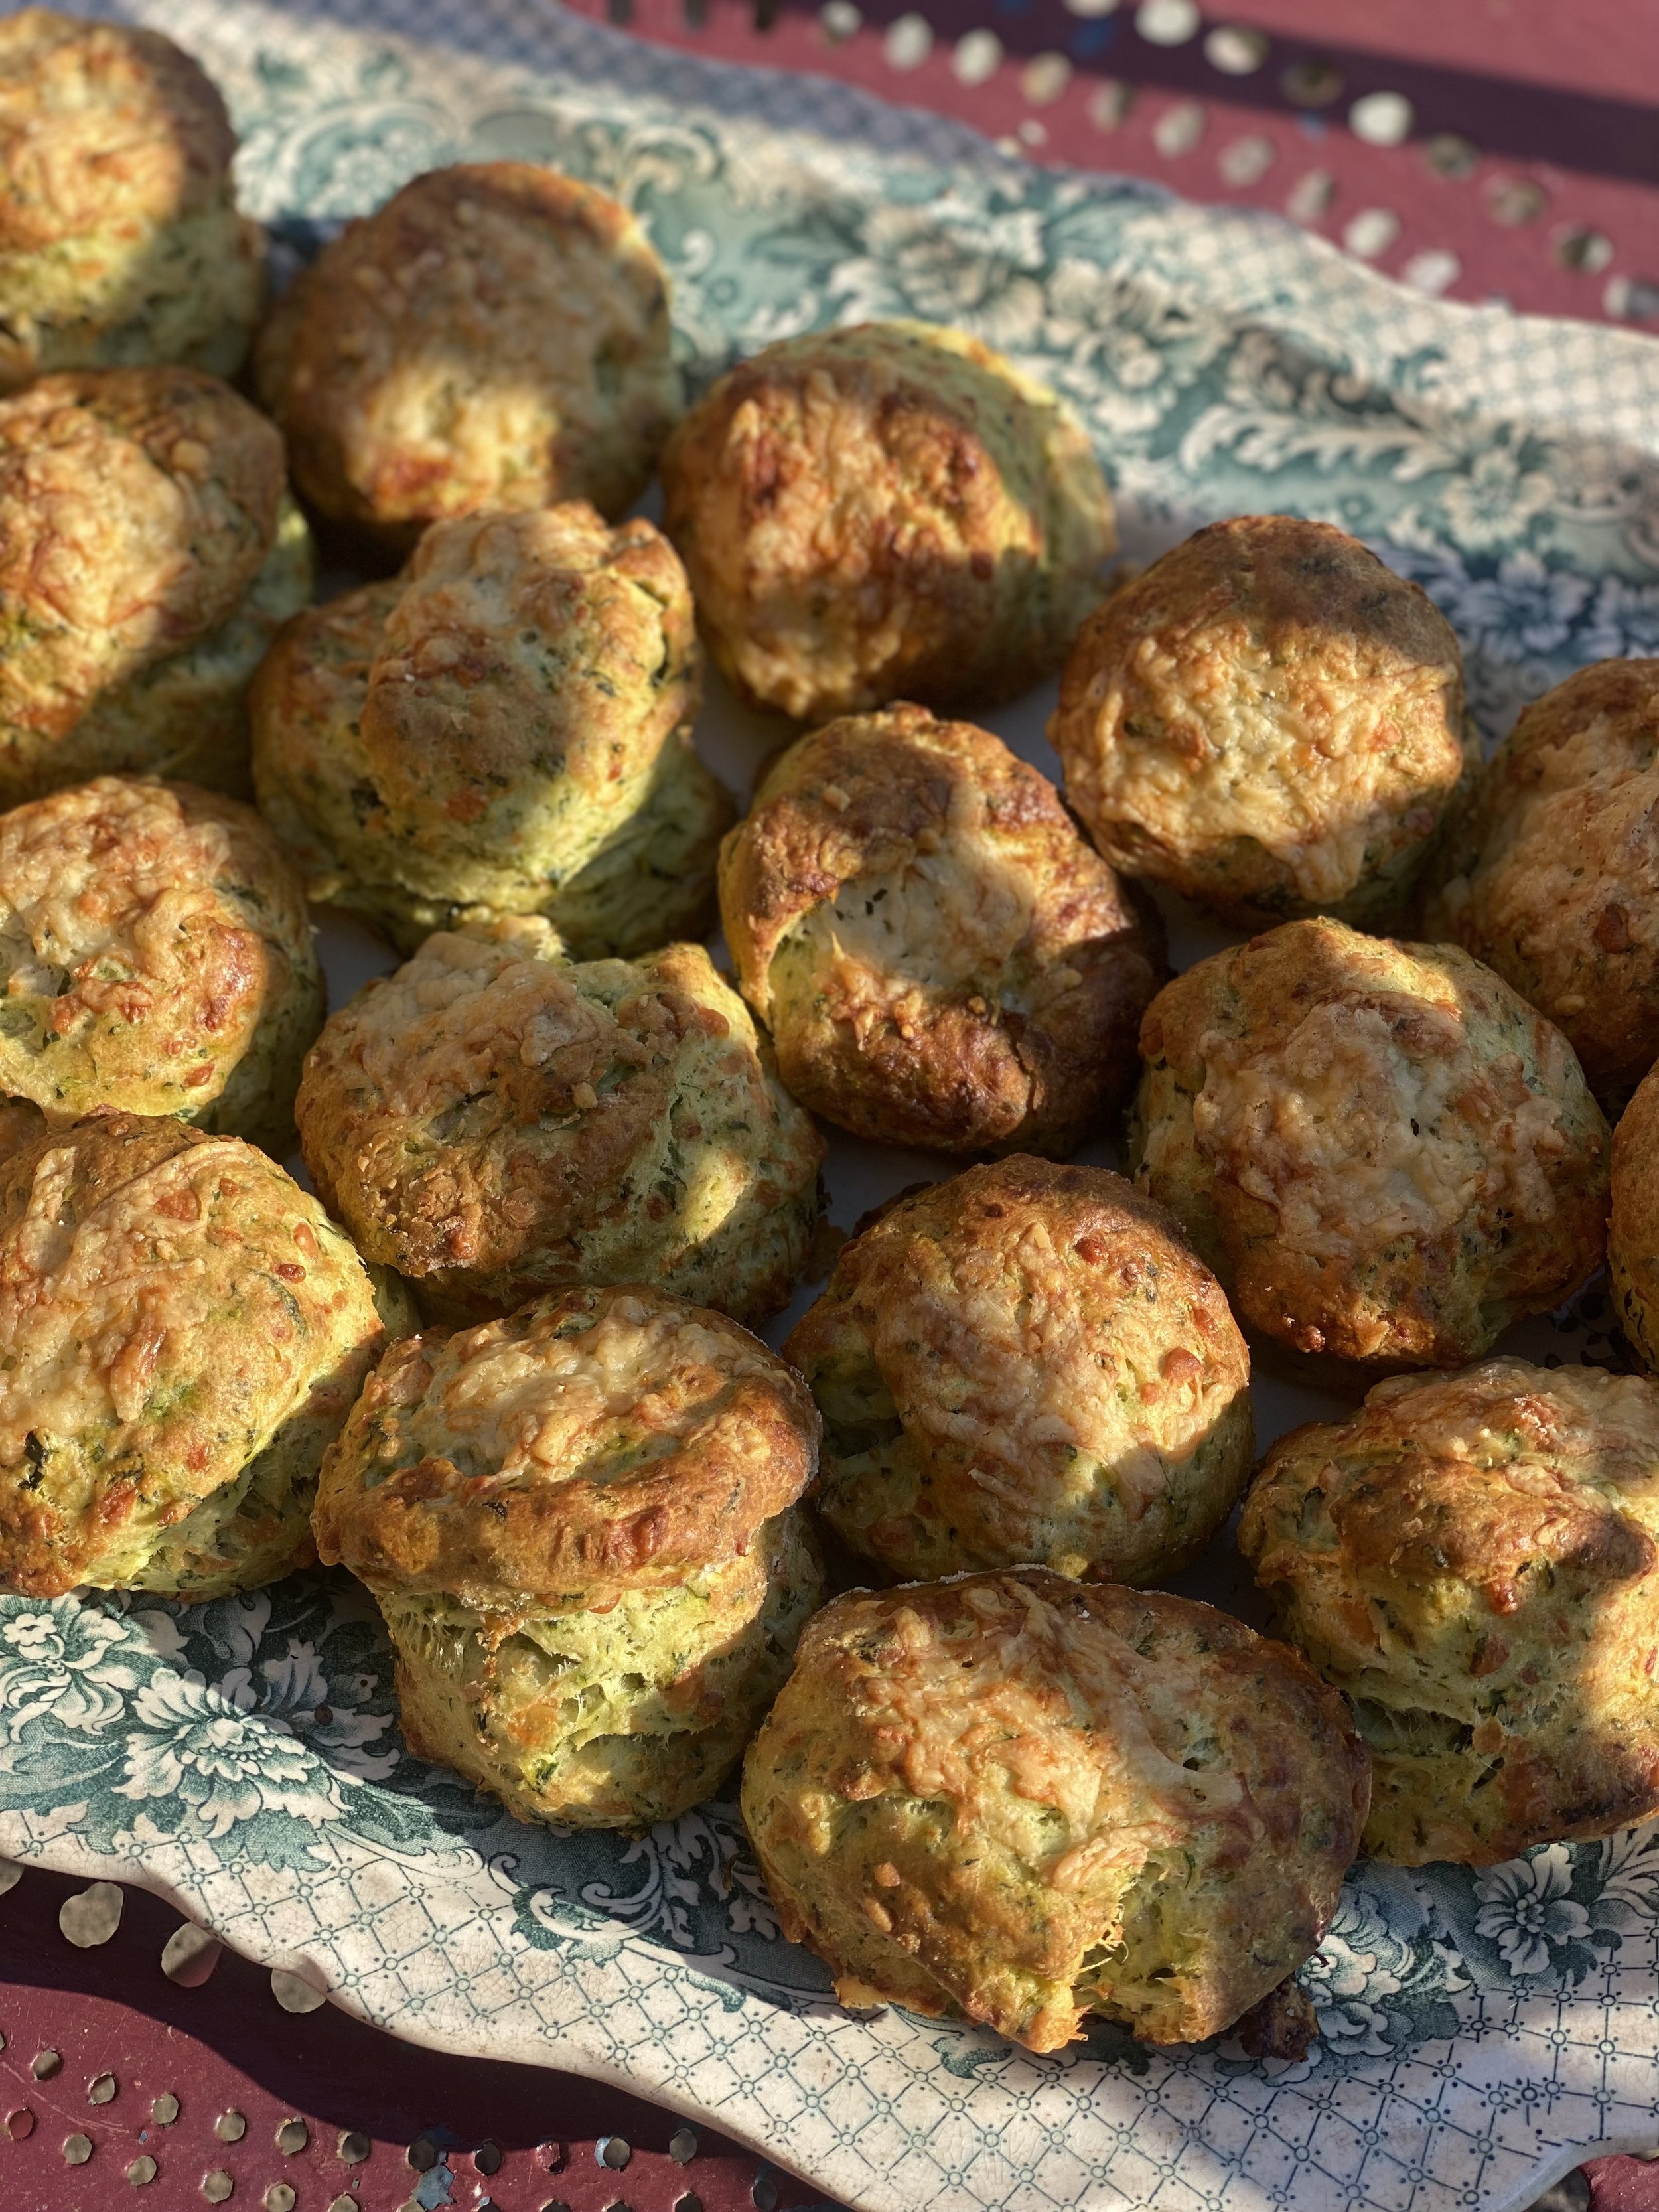
There’s something magical about foraging your own ingredients, and nothing signals the arrival of spring quite like the unmistakable scent of wild garlic. Found carpeting woodlands and riverbanks, its vibrant green leaves add a fresh, garlicky twist to all kinds of dishes—especially scones. Light, buttery, and bursting with flavour, these wild garlic scones are the perfect way to celebrate the season. Eat them slathered in butter or dip into soup!

Ingredients (makes 8-10 scones)

75g wild garlic, plus some extra leaves for topping
150g milk, plus extra to brush the scones with
2 eggs
450g plain flour
2 tsp salt
pepper
2 tsp baking powder
150g butter
75g cheddar
75g pecorino

Method

1. Preheat the oven to 200C FAN. In a pan over a medium heat wilt the wild garlic. This should only take a minute or so. Place the leaves into a jug with the milk and the eggs. Blitz using a hand blender until you have a vibrant green liquid and the leaves are well chopped. Set aside.

2. In a large bowl whisk together the flour, salt, a generous amount of black pepper and the baking powder.

3. Coarsely grate the butter and add to the bowl. Rub the butter into the flour mixture with your hands until you have a sandy consistency. Coarsely grate the cheeses and mix well.

4. Add 100g of the cheese to the bowl and stir to distribute.

5. Add the milk mixture and using a spatula begin to fold it into the mixture. You don't want to overwork it so fold gently will help. Once it has just about come together tip the dough out onto a lightly floured surface.

6. Gently pat it down until the dough is rough 4-5cm thick. Using a round cutter cut out discs, flouring the cutter in between each one. Arrange on a lightly floured baking tray. Gently press the excess back together and again pat down until roughly 4-5cm. Repeat the process until you have used all the dough.

7. Brush each scone with some milk then place a wild garlic leaf on top of each one. Sprinkle the remaining cheese over the scones then add a little more salt and pepper. Bake in the preheated oven for 20 minutes or until golden and hollow sounding when the bottom is tapped. Allow to cool a little before tucking in.

Recipe taken from Rowan & Wren


Wild Garlic Pesto

Just as vibrant in colour as it is in taste, wild garlic pesto is delicious thrown through pasta, swirled through soups and stews or served as a condiment to baked potatoes or a perfectly roast chicken. Wild Garlic is abundant at this time of the year and can be found and foraged in almost all woodland areas. When picking it it’s best to try and pick the leaves from an area that’s less likely to have been trampled on to ensure you get the best leaves possible and if you are unsure of whether the leaves are wild garlic the best way to check is to crush the leaves in your palm and take a good sniff. If it smells like garlic, then you’ve picked the right plant!

The below recipe is the one we follow but there are lots of adjustments you can make depending on taste, toasted hazelnuts can be a delicious addition and for those that like a sharper flavour add slightly more lemon.

Ingredients

100g wild garlic leaves

50g parmesan cheese

50g toasted pine nuts

1-2 tablespoons of olive oil

Lemon juice

Salt and Pepper

Method

Wash wild garlic leaves thoroughly.

Place the leaves, parmesan, olive oil and nuts into a food processor and blitz. You could also do this with a pestle and mortar if you want to be more traditional.

Add further oil if you wish to have a thinner texture and mix.

Add in your salt, pepper, and lemon juice to taste.

Squash & Sage Soup

Comfort in a Bowl: Homemade Squash and Sage Soup with Homegrown Organic Squash

There’s nothing quite like a bowl of warm, hearty soup and it’s just what we’re craving during these grey and chilly January days. This recipe is a perfect way to celebrate the bounty of squash we have left over from the autumn; using our homegrown, organic squash elevates the taste of this dish, creating a nourishing and flavourful soup that's ideal for a cosy lunch in our cafe. Served with a drizzle of oil and a chunk of fresh sourdough it’s comfort in a bowl.

Regardless of whether you have grown your own this recipe is still a winner, so we’ve included it below for you to make at home.

Why Squash and Sage?

Butternut squash is rich and velvety when pureed, making it the perfect base for soups. Its natural sweetness is balanced beautifully by the earthy, aromatic notes of fresh sage, and a hint of ginger adds a subtle warmth. This recipe is not only full of flavour, if you have grown your own it is a great way to use your organic squash, ensuring that the freshness and nutrients from your produce shine through.

Ingredients

  • 2 tablespoons extra-virgin olive oil

  • 1 large yellow onion, chopped

  • ½ teaspoon sea salt

  • 1 (3-pound) butternut squash, peeled, seeded, and cubed

  • 3 garlic cloves, chopped

  • 1 tablespoon chopped fresh sage

  • ½ tablespoon minced fresh rosemary

  • 1 teaspoon grated fresh ginger

  • 3 to 4 cups vegetable broth (adjust to desired soup consistency)

  • Freshly ground black pepper, to taste

Instructions

1. Prep Your Squash

The star of the show is, of course, the butternut squash. Start by peeling the squash with a sharp vegetable peeler and removing the seeds with a spoon. Once it’s peeled and cleaned, cut it into cubes. If you're lucky enough to have homegrown squash, you’ll notice the vibrant color and sweet aroma—it’s a sure sign that the soup is going to taste amazing.

2. Sauté the Aromatics

In a large pot, heat the olive oil over medium heat. Add the chopped onion and a pinch of sea salt. Sauté the onion for 5–7 minutes, or until it softens and turns translucent. This step is essential for building flavour.

3. Add Garlic and Herbs

Next, add the garlic, chopped sage, rosemary, and fresh grated ginger to the pot. Sauté everything together for an additional 2–3 minutes. The combination of ginger and rosemary creates a delightful fragrance, while the sage adds depth and an earthy, comforting aroma.

4. Add the Squash and Broth

Once your onions and herbs are fragrant, add the cubed butternut squash to the pot. Stir to coat the squash in the olive oil and aromatics. Then, pour in 3 cups of vegetable broth (you can add a little more if you prefer a thinner soup). Bring the mixture to a boil, then reduce the heat and let it simmer for about 20 minutes, or until the squash is tender and easily pierced with a fork.

5. Blend the Soup

Once the squash is soft, it’s time to blend! You can use an immersion blender directly in the pot for a smooth, velvety texture, or transfer the soup in batches to a stand blender. Blend until completely smooth. If the soup is too thick for your liking, simply add more vegetable broth until you reach your desired consistency.

6. Season and Serve

Taste the soup and adjust the seasoning with freshly ground black pepper and additional salt, if needed. For an extra touch, drizzle a little more olive oil on top, and maybe even garnish with a few sage leaves for visual appeal. Serve hot with crusty bread or a dollop of sour cream for a rich finish.

Tips for Perfecting Your Soup

  • Freshness Matters: When using homegrown squash, the natural sweetness and depth of flavor come through beautifully. If you’re using store-bought squash, look for firm, unblemished fruit with deep orange skin.

  • Vegan Option: This soup is naturally vegan if you stick to vegetable broth. If you want to make it even more creamy, consider adding a splash of coconut milk or oat cream at the end for richness.

  • Herb Variations: While sage and rosemary make the perfect pairing for squash, feel free to experiment with thyme or tarragon if those herbs are available in your garden.

Bridal Beauty: Make-Up Artist Hollie Danby’s Must-Know Tips

Bridal Beauty: Make-Up Artist Hollie Danby’s Must-Know Tips

It takes a lot of people to create a truly unique and beautiful wedding, and one of the things we love most about hosting them is the amazing artists we get to meet. Whether it’s florists, chefs, planners, entertainers, or musicians, everyone is passionate about their craft, and we find it so inspiring to work alongside them.

Makeup artists are often tucked behind the scenes, but for the bridal party, they play a huge role in the day—often being there from early in the morning until the moment you leave to walk down the aisle.

Hollie Danby is a Dorset-based makeup artist we’ve worked with on numerous weddings. In this blog she’s shared her expert tips on achieving flawless bridal beauty. From long-lasting makeup hacks to choosing the perfect look for your big day, Hollie offers everything you need to feel confident and radiant all day, and night, long.

Image credit Yeah Mike Photography: https://www.yeahmikephotovideo.com/

Image credit for title image Jack Aldridge Photography: https://www.jackaldridgephotography.co.uk/

Q. How do I choose a hair & make-up artist? 
A. First, consider whether you’d like to book two different people or have the same person to do both. There’s no right or wrong. Having the same person do both your hair & makeup means fewer appointments, admin & fewer people around on your wedding morning if you want to keep it smaller. If you choose two different people, make sure they’ve worked together before and that their styles align.
Next, think about location. I always advise choosing someone local if you can. It’s always great to support the local economy where you’re getting married, and travel costs on the day will also be lower. I mostly try not to travel more than an hour and there are so many great artists all over the country. The only thing to bear in mind though when choosing an artist local to the area you are getting married in is often you will have to travel to them or they will have to travel to you for your hair & makeup trial so ensure you factor in these expenses if you don’t live in the same area. 

Next, what style of hair & makeup are you looking for? Don’t choose an artist who showcases a lot of heavier, glam looks if you want a natural look, and vice versa. Artists can create most things for you but it’s much better to choose a style within their skillset as you’ll likely get the desired outcome. 

Lastly, choose someone you actually think you’ll get on with. Your hair & makeup artist is with you for a long time on your wedding day so choose wisely! What kind of energy do you want for the day? Someone calming? Someone with big energy? Ensure you get a good vibe match & someone you can communicate well with so you start your day in the best way possible!

Q. I don’t know much about hair & make-up and have no idea what to ask for - all I know is I want to look my best! Any advice?! 
A. The best advice I can give is to think about your day-to-day hair and makeup routine and then what you would do on a night out/event. I often ask for photos of both of these so I can assess what your ‘normal’ is. Some people (for example me, haha) don’t leave the house without their eyebrows drawn on while others (not me) don’t leave the house unless they are fully glam. ‘Your best’ looks different for everyone…! We want something that feels like you, but elevated slightly for you to feel your best. Perhaps a happy medium in-between your going out/event makeup & your everyday. Your look, especially your hair, ties in with what you’re wearing. So we also bring in details, styles & colours from your dress to help influence the hair & makeup so it flows beautifully.

Another point is: Pinterest CAN be good for hair & makeup inspiration, but it also can be awful… It can lead you down a loophole of AI images of women who aren’t even real & cause you to spiral because of unattainable beauty standards. I tend to point my clients to look at red carpet looks as they are always bespoke to the client. Have a think about someone you’ve been told you look like or someone with similar hair to you, then similar colouring and start there. You’re more likely to get some more modern ideas from there too as sometimes searching ‘bridal’ can bring up some very dated styles. 

Q. Should I have a trial?
A. Absolutely, yes. Your trial is probably the most important part of the booking. You’ll get to know your artist & also try a few ideas to see what you like. It’s very much a two way process so the more you prepare for your trial, the more you will get out of it. I had a client recently create a look-book for her wedding day complete with: her two dresses, her accessories, colour scheme, flower ideas, colours she likes for makeup, hair styles she likes, details from makeup looks she likes. Putting them all together like this, similar to a vision board, means I can see the full picture of your day and everything that’s going into it. Something like this is absolutely perfect to bring to a trial as we have all the ideas in front of us, know what we’re doing and then I can add my creative spin on it. Giving you the best of my abilities. Whereas, if you arrive with no idea at all, we’ll spend most of your trial figuring out what you do want and we won’t have the time to really finesse or amplify any ideas. 

Q. How do I prep my skin to make sure it’s looking its best on my wedding day?
A. I send out a welcome guide filled with information about looking after your skin and if any client reaches out to me with specific issues I will always offer bespoke advice. The earlier you start looking after your skin the better it will look on your wedding day. My clients generally book their wedding 1 year+ in advance so I always encourage them to start with a good routine then. Generally I encourage more hydration & also exfoliation so makeup sits well on the skin. Your makeup is never going to sit well on skin that is washed with no skincare routine just soap & water… I’ve seen it many times before! Makeup just sits on top of the skin & never looks right. I recommend everyone to follow Caroline Hirons, download her app & buy her books called ‘Skincare’. It’s a 101 for basic skincare & packed with tips. Also please don’t use lots of acids & retinoids without doing your research on how to use these properly! You’ll damage your skin. If you use them properly however you’ll get great results. 

Outside of at-home skincare there are also clinical treatments. I had a hydra facial recently & was absolutely blown away. It’s the only facial I’ve ever had with instant wow - which is its USP. I highly recommend these towards the lead up to your wedding. They are also tailored for the type of skin you have so are beneficial to everyone. There are lots of other treatments like peels, Venus Freeze & LED light therapy which are all incredible too. Locally I recommend Sarah Dale in Poundbury. I also use my at home LED mask (use HOLLIEMUA for discounts!) almost everyday & am loving the results - seeing smoother, glowier & plumper skin. 

Q. Do you have any star products you recommend brides buy? 
A. A hat, a good spf & sunglasses. Keep the sun away from your skin and thank me later! Get a good spray tan / fake tan instead. There's also lots of ideas here also of what to have in your wedding handbag.


Q. Will my hair & make up need topping up during the day/evening? 
A.
All artists do everything in their power to create something that is going to last as long as possible for you. But we can’t promise everything will stay just as it is in the morning. For example, if you have a low, undone bun and people are hugging you all day, your hair is going to get bashed around so it definitely won’t stay intact unless extra care is taken. I once heard of a guest’s bracelet getting caught in a bride’s hair and pulling it out, so there are issues like this that are beyond our control. Also the weather has a massive part to play too! Wind and rain are not a hair stylist’s friend. The only thing you can do is have two styles like a hair up and a hair down look then on the day see what the weather is like and go for whichever one works best for the day’s weather. The most likely scenario with your hairstyle is that it will end up looking a little more ‘lived in’ by the end of the day. Unless you go for something like a sleek, editorial bun or Hollywood waves which tend not to budge. 

Makeup wise we often wipe around our nose & mouth or obviously eyes too if you’re a bit emotional so you may need some top ups here. We emphasize dab and don’t rub to prolong your makeup. There are some professional sprays that can be used to ensure makeup is completely waterproof, but they are pretty heavy duty and personally I would just prefer to have a little concealer in my makeup bag to top up if needed on any areas that really need it. If you want to refresh your makeup later in the day, spritz your skin with a finishing spray like the Charlotte Tilbury one, this will help refresh your makeup and blend any top ups into your makeup beautifully. Most likely you might just need a dab of concealer as mentioned and usually always a top up of your lip products. You will probably be having far too much fun to even worry about doing any of this!

As another option there’s usually an optional add-on to have an artist come back in the evening, refresh your hair + makeup or even create a second look for you. Some artists can also be there post-ceremony for you too. 

More tips:

  • I love products like lip stains which you can use on cheeks & they last sooo much longer! 

  • I only ever use the Beauty Pie waterproof mascara which is what I call bulletproof. You can rely on her, trust me! No smudgy mascara here.

  • I only ever use It Cosmetic's Bye Bye Undereye, a waterproof concealer, under eyes.

  • Don’t ever, ever, ever use a steamer post-makeup or your hair & makeup artists will cry. Your hair will go frizzy and your makeup will melt off.

If you’d like any more information from Hollie or to take a look at her gallery head to her website, Instagram or drop her an email.

Image credit Sofia Veres: https://sophiaveres.co.uk/

Image Credit Jack Aldridge Photography: https://www.jackaldridgephotography.co.uk/